This is a tutorial about how to make Bluetooth Hearing Aids work with Linux. In general, Bluetooth Hearing Aids work similar to any normal Bluetooth headset. However, I discovered an exhaustive tutorial is missing which covers issues that can occur when using hearing aids with Linux.
Target Audience
This tutorial is written for people who use Linux, but are not necessarily experts in the operating system. I aim to explain a lot of details and illustrate everything with screenshots. If you are a Linux pro, you probably can skim over a few things.
Feedback
If you follow this tutorial, whether you have good or bad experiences with it, I am interested to hear from you (use the Contact options). In particular, if you find something missing or hard to understand, let me know. Make sure to include what hearing aid (and possibly Bluetooth adapter) and Linux flavor and version you are using. If it helps, attach some screenshots of where you are having issues. Thank you!
Part 1: Test Setup and Preparation
The Test Setup
This tutorial was tested so far with only one set of hearing aids. As I am a hard of hearing person myself, I unfortunately do not have a plethora of devices available for testing. I believe this tutorial will apply to most Bluetooth hearing aids on the market and to most Linux-based distributions. The look and feel and the details may vary depending on your hearing aid’s brand and the Linux flavor you are using.
I tested this with a pair of hearing aids of the model Phonak Audéo Marvel (complete review of the hearing aid here). The Linux flavors I tested this on were: Ubuntu Linux 19.10, 20.04, 20.10, 21.04, 21.10, and Debian 11. The computers running those operating systems were in all cases a Lenovo Thinkpad X1 Carbon (6th generation).
Compatibility of Bluetooth Hearing Aids with Linux
There are different types of Bluetooth-compatible hearing aids on the market. Some can use Bluetooth directly, that means without an additional adapter that you have to wear close to your body. Back in 2019, when I bought my hearing aids, there were only two hearing aid brands on the German market that implemented Bluetooth without an adapter: Phonak and Resound. Phonak released the successor of the Audéo Marvel, which is called Phonak Audéo Paradise and has a similar handling to the Audéo Marvels.
Resound made a name as the first company to offer built-in Bluetooth hearing aids, but the first releases were only compatible with iPhones (under the “Made for iPhone” label). As those only worked with a proprietary Bluetooth specification that Apple had published, it was not possible to use them on other Bluetooth compatible devices. If you have one of those “Made for iPhone”-exclusive hearing aids, you might not be able to use Linux with them. In this case, this tutorial will not help you, because they simply are not compatible with the Bluetooth implementation of computers that run Linux.
Back in 2019, Resound was offering the first hearing aid that was supposedly compatible with Android: ReSound LiNX Quattro (see my complete review here). However, the way they implemented it, it did not use the normal Bluetooth protocol, but they required their ReSound App to be installed on the device for it to work. Since there is no Resound app for Linux, you will have no luck with connecting those hearing aids to Linux (unless they fixed this in the meanwhile).
Besides those hearing aid models who have built-in Bluetooth, there are a variety of manufacturers which offer Bluetooth with an additional adapter. Whether you are wearing Widex, Oticon, or Signia devices, there are good chances that you can buy this additional adapter for them. If you do not have such an adapter yet, ask your acoustician (Hearing Aid Audiologist) about it.
To summarize: if you have the Phonak Audéo Marvels or the Phonak Audéo Paradise or one of the hearing aid models that come with an adapter, then this tutorial is for you. In the remainder of this tutorial, I will talk about “connecting your hearing aids” to a Linux computer via Bluetooth, which means that you directly connect your hearing aids if they have built-in Bluetooth and otherwise you will instead connect your adapter to the Linux computer.
Note: I am interested in listing all specific hearing aid brands (and adapters) for which this is working. If you managed to follow this tutorial with a different hearing aid than the Phonak Audéo Marvels or the Phonak Audéo Paradise, please send me an email with your setup (Contact). Thanks!
Preparation
Before you try to connect your hearing aids to a Linux computer, make sure it is not connected to any other device (unless you are using the Phonak Paradise model, then see next paragraph). If, for example, they are currently connected to your phone nearby, close this connection between them. You can do this by disconnecting the Bluetooth device on your phone or by disabling Bluetooth on your phone altogether temporarily.
If you are using the Phonak Marvel Paradise hearing aid model, this is actually not necessary. Those models are capable of being connected to more than one device at a time. For using them with your Linux-Computer you do necessarily have to disconnect them from your phone. It can happen though that they do disconnect from one device automatically as soon as you start using the other one for streaming.
Name of your Hearing Aid
Your hearing aid might show up with a different name than mine in the examples in this tutorial. In fact the name “HG R” is something I chose myself. For my brand of hearing aids, I was able to choose the name and my acoustician was able to set it with their software. You will likely not be able to set it yourself (with a smartphone app for example), but you need your acoustician (Hearing Aid Audiologist) to do that for you. Most names that are set by the manufacturer as default will probably include the manufacturer’s name or the term “Hearing Aid” – in case you do not know what you should look for.
Part 2: The list of available Bluetooth devices
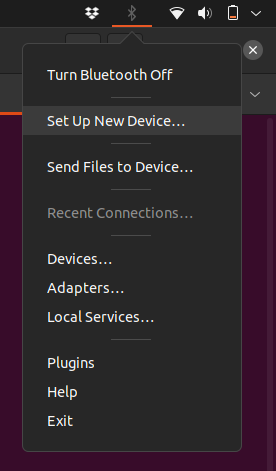
Before we start, we should also make sure that your Linux computer is currently not connected to other Bluetooth devices, like a Bluetooth speaker or your spouse’s hearing aids. To do this, open the list of Bluetooth devices that are “seen” by the Linux computer. “Seen” here means all Bluetooth compatible devices which are in the vicinity of the Linux computer close enough to possibly be connected to it.
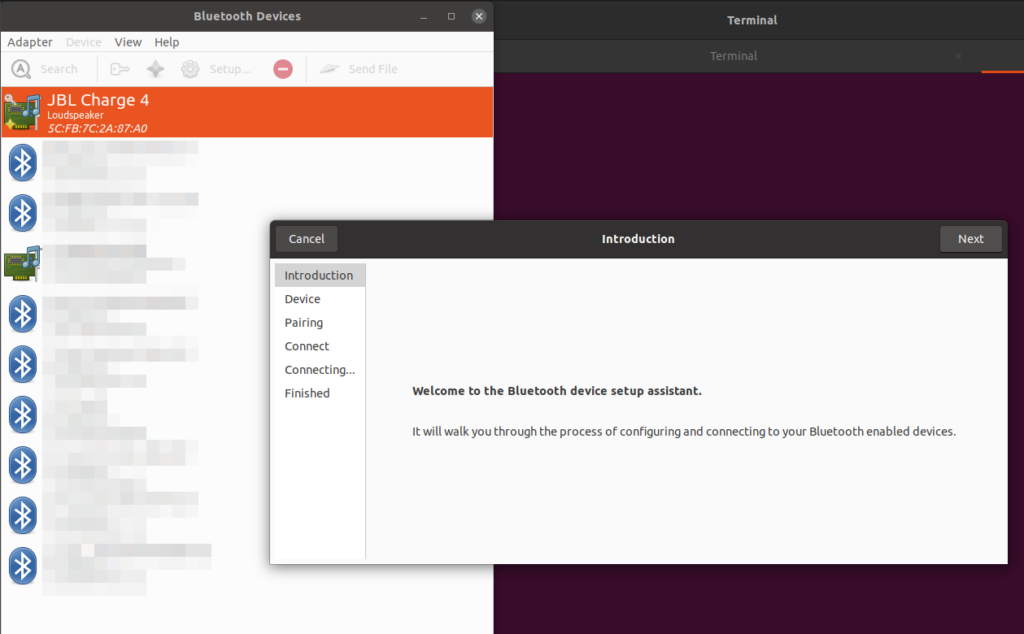
To get the list, click on the Bluetooth Icon in the upper right corner of our UI, select “Devices …”:
A window titled “Bluetooth Devices” should open:
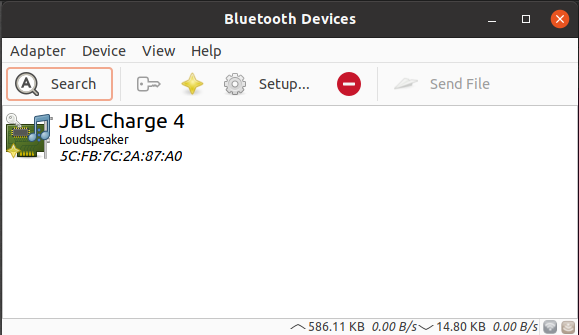
In this example, the computer sees one Bluetooth compatible device, “JBL Charge 4”, which is my Bluetooth speaker. There might be more and different ones in your case. You might even see devices that you do not own yourself, like your neighbor’s headset or fitness tracker.
Note that there is a little yellow star in the lower right corner of the icon next to the “JBL Charge 4”. This represents that the computer “trusts” this device in the Bluetooth sense of things. This means that it has been connected to it before and will try to reconnect with it automatically, whenever the device shows up close to the computer.
You see here no hearing aids yet. This might be because the computer only once in a while re-scans its environment for new devices and the current state of the list might just be outdated. We can force a re-scan by hitting the “Search” button at the top.
Now the computer will send out Bluetooth signals into the room and all compatible devices in the room will answer to tell the computer that they are there. Assuming that you sit in front of your computer wearing your hearing aids (which are switched on), they should show up in the list eventually, like this:
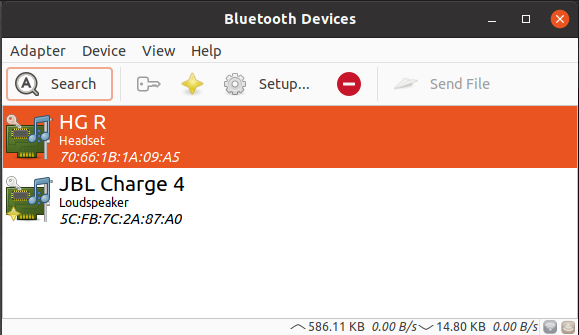
“HG R” is one of my hearing aids. This means that my computer can see it, and potentially connect to it.
What to do when the hearing aid does not show up
If, even after a few retries, you still don’t see any of your hearing aids in the list, try this: sometimes Bluetooth devices only “answer” the computers search signal when they are in “pairing mode”. You can usually trigger them into going into this mode by switching them off and on again.
For battery powered hearing aids, this means opening and closing the battery compartment for a second. For rechargeable hearing aids it usually means to long-press the button on your hearing aids, wait a few seconds and long-press it again to start them.
For hearing aids that use a Bluetooth adapter, you should restart the adapter. There might also be an extra button on the adapter to trigger this mode, but that depends on your brand and model of adapter and is best found in its manual. The “pairing mode” usually only lasts 30 seconds, make sure to hit the “Search” button within this timeframe.
Why is there only one hearing aid in the list?
If you use built-in Bluetooth hearing aids, you might wonder why only one of your hearing aids shows up in the list of devices. There is a technical reason for that. Due to how the classic Bluetooth protocol is defined, it is only ever possible to connect one device (the Linux computer) to one other device (the hearing aid or the headset). However, hearing aids come in pairs, hence there is of course a problem how to get the data (like an audio stream of the music you want to listen to) from the computer to both hearing aids if I can only connect one of them.
Hearing aid manufacturers solved this problem by making the connection between only one hearing aid and the computer. When you then play sound on the computer, the audio data gets streamed to the connected hearing aid and then the connected hearing aid sends the audio stream to the other hearing aid. For an audio stream in stereo, this actually means that the data of two audio streams is send to the connected hearing aid and then one of them is sent further to the other hearing aid. This last step from one hearing aid to the other is not done via Bluetooth, but via a proprietary wireless protocol which is different for every hearing aid manufacturer. However, this should work out of the box, hence all you need to worry about is how to connect the Linux computer to that one hearing aid.
Note: In this setup the Bluetooth-connected hearing aid has to do “more work” than the other one (because it has to receive and send an audio stream at the same time). This can result in your connected hearing aid consuming more power than the other one. Don’t be surprised if you have to change that one’s batteries more often or recharge it earlier than the other. This is by design.
Part 3: Pairing for the very first time
When you want to use hearing aids with a Linux computer, the situation is not much different from using a Bluetooth headset with a Linux computer. If you want to use them for the first time, you have to “introduce” them to each other, which in Bluetooth-speak is called “pairing”.
We do this by (again) going into the Bluetooth menu, choosing “Set Up New Device”.
The window of a pairing assistant should open:
Note: If you do not see “Set Up New Device” in the menu, you can instead hit “Search” in the list of Bluetooth Devices and once your hearing aid shows up in the list, right-click and select “Pair”.
In the Setup Assistant, click “Next” in the upper right corner.
You will see again the list of available Bluetooth devices. It is now even longer than before, because meanwhile the computer found a few more Bluetooth devices in the vicinity. The example list here includes my Bluetooth speaker as well as my hearing aid. (Should it be that you again do not see your hearing aid in your list, you can go back to the window “Bluetooth Devices” and do the search again as described above.)
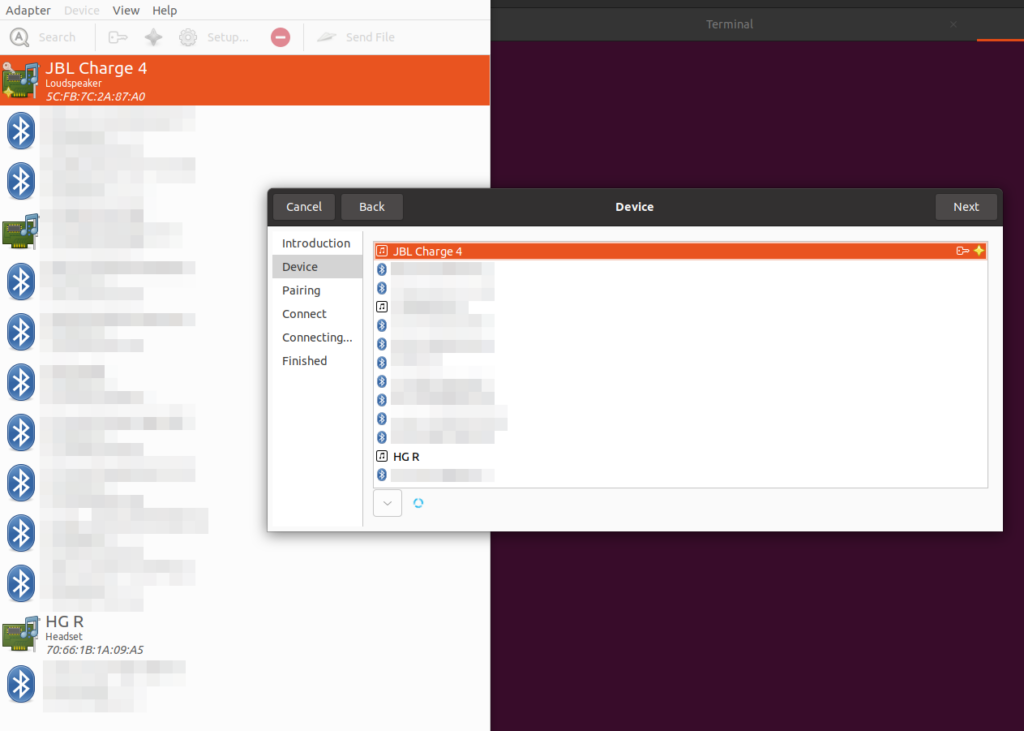
Click on the hearing aid and then on “Next” in the upper right corner.
You get to the next page of the assistant which asks you what pairing method to use, which only offers two options, one of them being “Pair Device”.
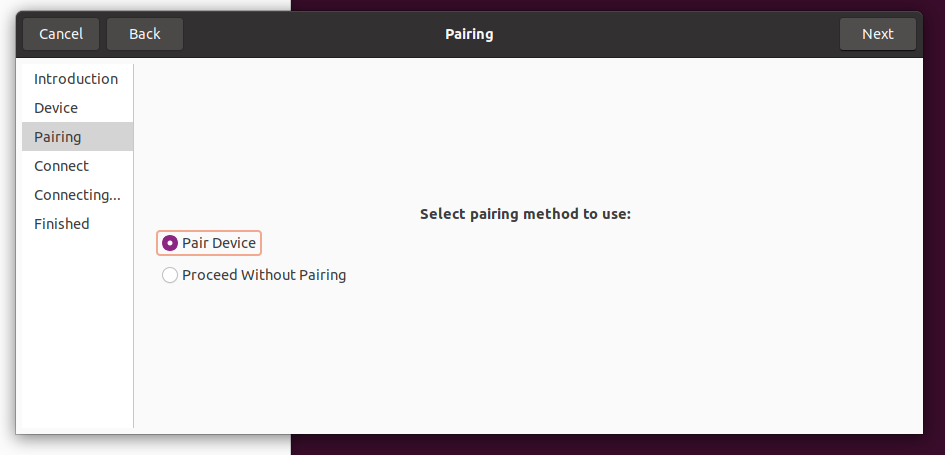
Choose “Pair Device” and then hit “Next” in the upper right corner again.
After some seconds, it will have created the connection and tell you that the pairing was successful.

Now after the successful pairing your computer and your hearing aid know each other. Technically speaking, this does not mean yet that they have already established a connection. However, in most cases, the connection should be made directly after the pairing. You can see that they are connected, if there is a little icon with a red, green and blue bar next to the hearing aid in the list of Bluetooth devices.

If the pairing was successful, but you do not see this icon or it shows up for a split second and then disappears again, just proceed with the section “Connecting Hearing Aid and Computer” below.
Troubleshooting Pairing
The pairing might not go as smooth as described here. Instead of the “Congratulations” screen in the assistant, you might have gotten a message that the pairing was not successful.
There could be a couple of reasons for this. I generally recommend redoing the procedure. Pay extra attention to these points:
- Make sure your computer and your hearing aids are close to each other (less than 2 meters).
- Neither the computer nor the hearing aid are connected to other devices.
- The hearing aid shows up in the list. If not, redo the search. Consider re-setting it into pairing mode.
- If the hearing aid is low on power, check if it works better with fresh batteries or shortly after recharging.
- Try several times again and again. Bluetooth is a finicky protocol. Be patient.
Part 4: Connecting Hearing Aid and Computer
At some point you will want to connect your hearing aid with the computer. This might be directly after pairing in case they did not connect automatically then or any time after that when you left and re-approached your computer again.
Make them trust each other
Your computer might have already asked whether you want it to always automatically reconnect to this device. In that case, whenever you get near your computer after they lost the connection, they will automatically connect again. What I mentioned earlier is that they “trust” each other.

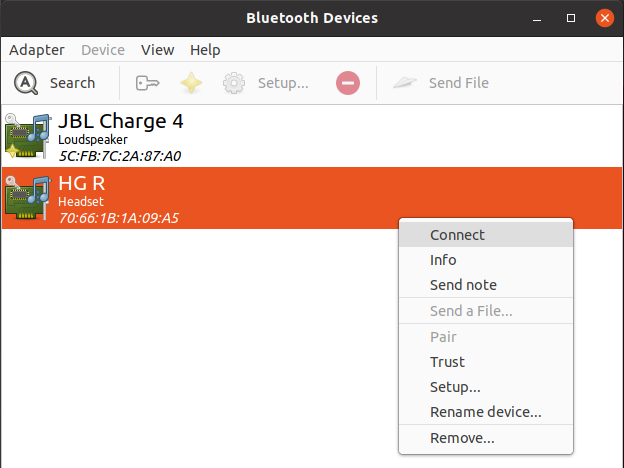
If your computer did not ask you whether you want to automatically reconnect or trust the hearing aid, you can explicitly tell your computer to do so. For this, you need to select the hearing aid in the list of Bluetooth Devices, right-click on it and select the menu item “Trust”.
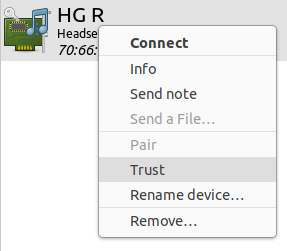
After that, the yellow star should appear on the icon of the hearing aid.
Trigger Connection explicitly
Even though this mechanism of trust is a handy concept, there are situations where you want to trigger the connection deliberately. Either because the automatic reconnect did not work or you did not configure them to trust each other earlier. In any case, you can establish the connection as follows.
Open the list of Bluetooth devices, find your hearing aid. If it is already connected, then there should be the red/green/blue icon next to it.
Also, in this case, the Bluetooth icon in the upper right corner is no longer blue and white, but blue and green. This is a bit subtle, but after a while you will appreciate this as a quick indicator if you are connected or not.
If there is no connection, you can trigger a connection by selecting the hearing aid in the list, right click and “Connect”. After a few seconds, the red/green/blue icon should appear next to it. If it does not, see the section “Troubleshooting connection” below.
If you managed to establish a connection, you can try if it works by playing some sound like a Youtube video.
Troubleshooting the Connection
It can happen that establishing the connection does not work. In this section we look into a few error messages and what to do about it.
Error Message “Connection failed: Resource temporarily unavailable”
When you try connecting, you might get this error message:
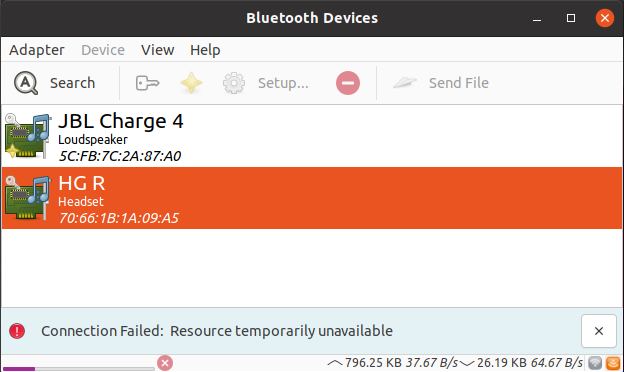
This usually happens if your hearing aid is up and running and near the computer (so that in theory they can “see” each other), but it already has a connection established to a different device. Go back to the Section Preparation above and make sure the hearing aids are not connected to your phone for example.
Sometimes this happens despite you having already cut the connection to the other device. However, it might be that it takes a while for your hearing aids to realize that it does not have a connection to that device anymore. In this case it helps to wait a minute or to restart the hearing aid.
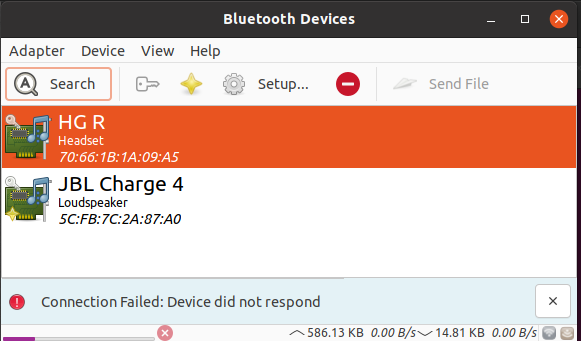
Error Message “Host is down”
When you try connecting, you might get this error message:

This usually means that your hearing aid is not switched on, about to die because of low battery, still in the process of booting (after you restarted it) or simply not in the vicinity of the computer. This happens most often to me when I am trying to troubleshoot something and I restarted the hearing aids, but then I was too impatient to wait a few seconds till they are up and ready to connect.
If this persists, check if the hearing aid is switched on and has enough power. If you just restarted them, give them a few seconds to be fully ready.
More Error Messages
I honestly don’t really know when exactly these happen, but also here, I would try the usual advice of: wait a bit, try again, restart the hearing aid if necessary.
Hearing Aid repeatedly connects and disconnects automatically
It can happen, that your Linux computer manages to automatically connect to your hearing aids, but immediately disconnects again. This can happen in a loop where connecting and disconnecting goes on forever.
What often helps here is to temporarily disable Bluetooth on the computer and see what happens after enabling it again. For disabling Bluetooth, click on the Bluetooth-icon and select the respective menu item.
If everything fails when troubleshooting the connection
I had occasions, where my hearing aid simply refused to connect, no matter what I tried. Bluetooth is finicky. It can happen.
You can start from a completely clean slate, by removing the knowledge that your computer has about your hearing aids and then starting over by pairing them again as if they had never seen each other before. For how to do that, see the next section “Undo”.
Undo
Whether it is for troubleshooting or other reasons, you can always undo all of the actions you have done: pairing, trusting, connecting.
- If you have established a connection and want to cut it, right-click on the hearing aid in the list of Bluetooth Devices and chose “Disconnect”. The red/green/blue icon next to it should disappear and the Bluetooth icon in the upper right corner of your desktop should become blue-white again (instead of blue-green).
- If you have set the relationship of your hearing aid to your computer as “trusted”, you can undo this by right-clicking on the device and selecting “Untrust”. The yellow star at the Icon of the device should disappear.
- If you want to completely remove the device from the list, do right-click and “Remove”.
If you want to be very thorough about this, do all three steps in the order they are described here.
Part 5: Troubleshooting Bluetooth in general
You might have had trouble following this tutorial if you encountered some general Bluetooth problems, like the following:
My bluetooth icon has a little red icon on it

This means your computer’s Bluetooth is completely switched off. To switch it on, click on it, and select “Turn Bluetooth on”. This should make the red icon go away.
My Bluetooth icon is not there
That’s odd and should generally not happen. However we got into this mess, there is something we can try though:
Open a terminal window and type in:
blueman-applet &There might be some error messages coming here, ignore those. Hopefully this will make your Bluetooth icon reappear again.
Airplane Mode
Some laptops come with physical switches or special keys for a “airplane mode”. In ariplane mode, all wireless technology in the computer is disabled. That includes Bluetooth. So, if you have a laptop with such a switch or key and you have trouble getting any Bluetooth connection working, check whether the flight mode was accidentally switched on.
Part 6: Troubleshooting Audio
Let’s assume you have managed to pair your hearing aid with the computer and establish a connection. However, when you try to play some sound, you still don’t hear it. You have double-checked in that the hearing aid is in the list of Bluetooth Devices and has a connection established.
The Sound Settings
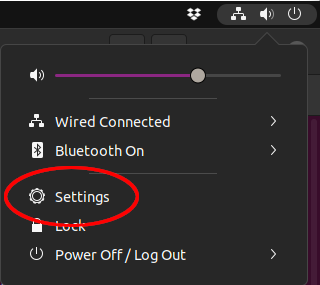
Check the sound settings of your computer. Open the “Settings” menu of your computer by clicking on the little speaker signal in the upper right corner of your screen.
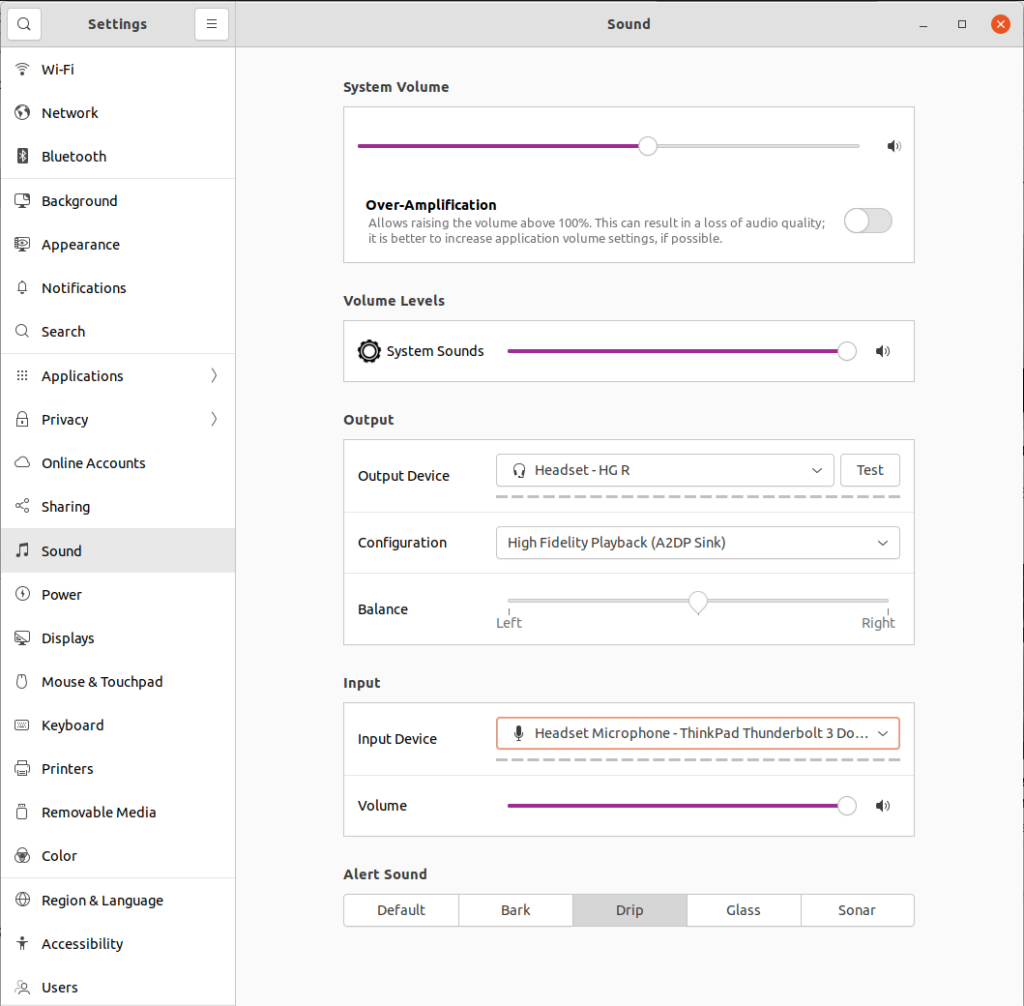
The settings tool should open. There are various settings categories, make sure that the “Sound” category is selected:
Hearing aid missing in the Sound Settings
If you do not see your hearing aids in the dropdown menu for the “Output Device” despite successfully connecting it, then there might be an issue with the underlying sound server system. Debugging this depends on what exactly is being used as a sound server system. Here are some suggestions in case pulseaudio is used. In a terminal type the following commands:
systemctl --user stop pulseaudioor (the hard way)
killall pulseaudioThis will kill the pulseaudio daemon running in the background.
Remove pulsaudio’s current configuration files. This basically makes sure pulseaudio forgets everything that it knows about currently connected sound devices:
rm -r ~/.config/pulse/*As the last step, restart pulseaudio:
systemctl --user start pulseaudioThis will start pulseaudio with a clean state of its knowledge of devices.
As the next step, close and restart the Sound Settings. After you do this, the hearing aid will hopefully be selectable as an output device. Note: if you were trying to play some sound in a program like a Youtube video in your browser or an audiobook in your mp3 player app, then you should close and re-open it after restarting pulseaudio, so that those programs can pick up the changes.
Tip: If you want to see better what pulseaudio is currently managing, you can use a graphical interface for it: pavucontrol. You can install it on your system, and then open it in the terminal with the command:
pavucontrolFor the following sections, we assume that you can select your hearing aid as a device in the sound settings.
Alternative Sound Server System
In Linux, there are many options to configure your system. You can, in fact, change what sound server system your computer actually uses. Pulseaudio is widely used and the default in Ubuntu (as of 21.10), but there are alternatives. One of them is pipewire.
I am not expert in pipewire, but I have heard of people fixing their hearing aid connection issues, by switching from pulesaudio to pipewire. There are instructions for this switch here.
Setting the right sound configurations
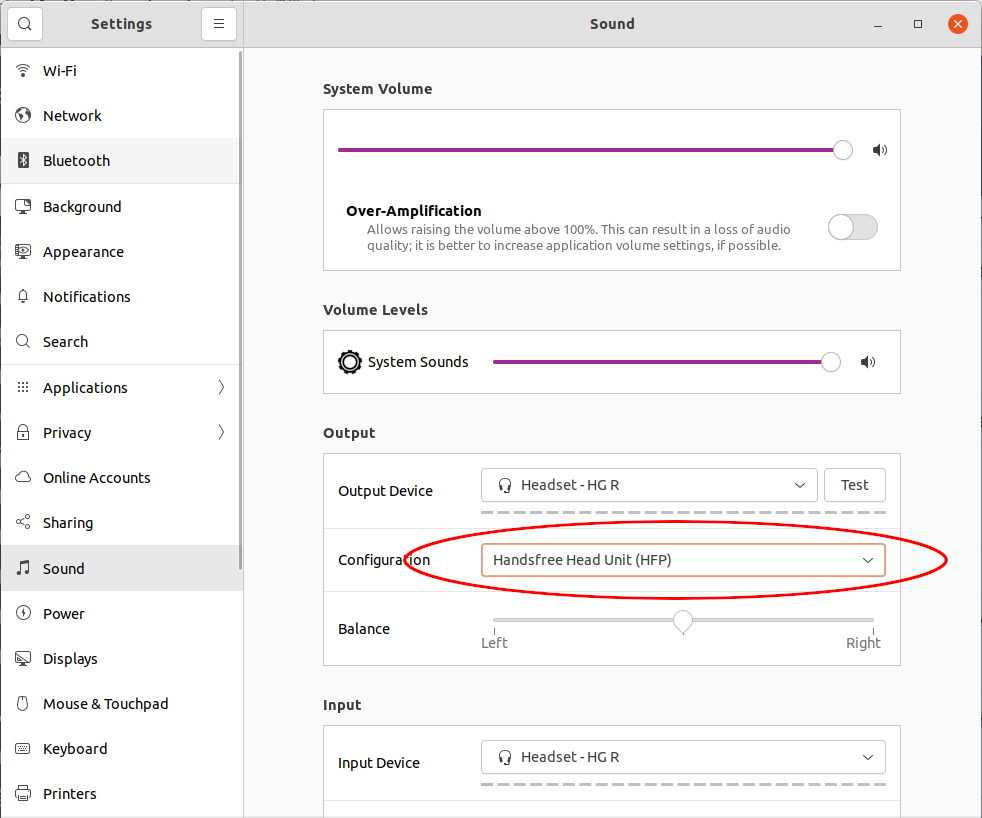
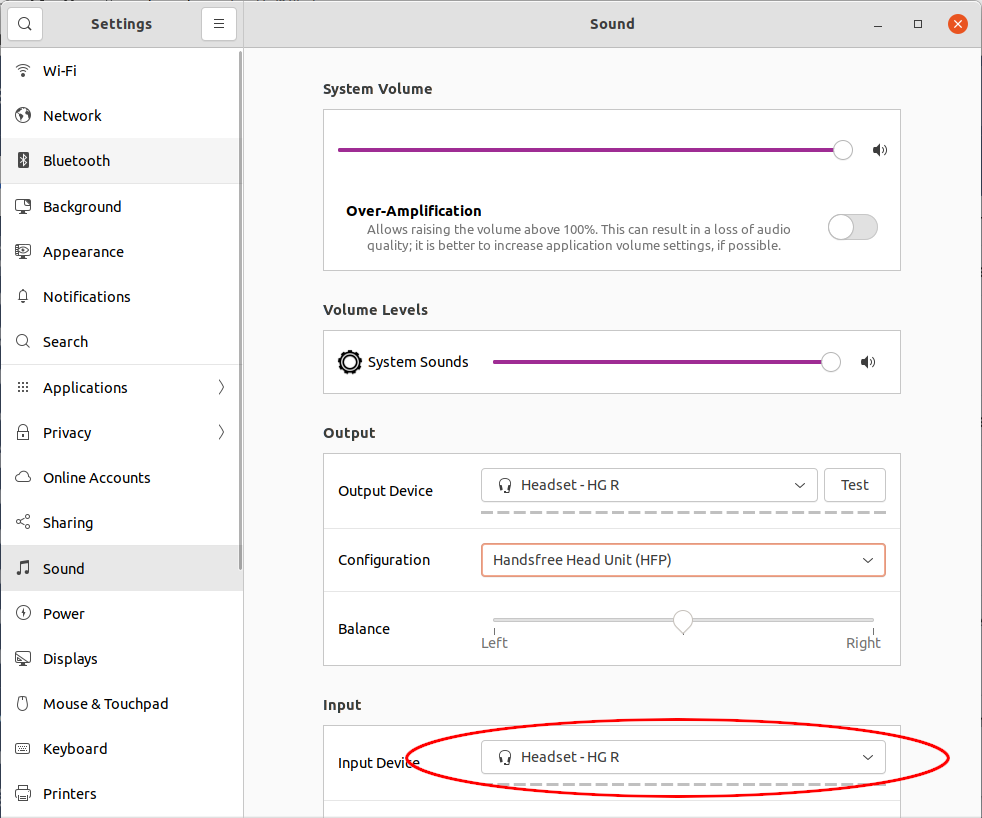
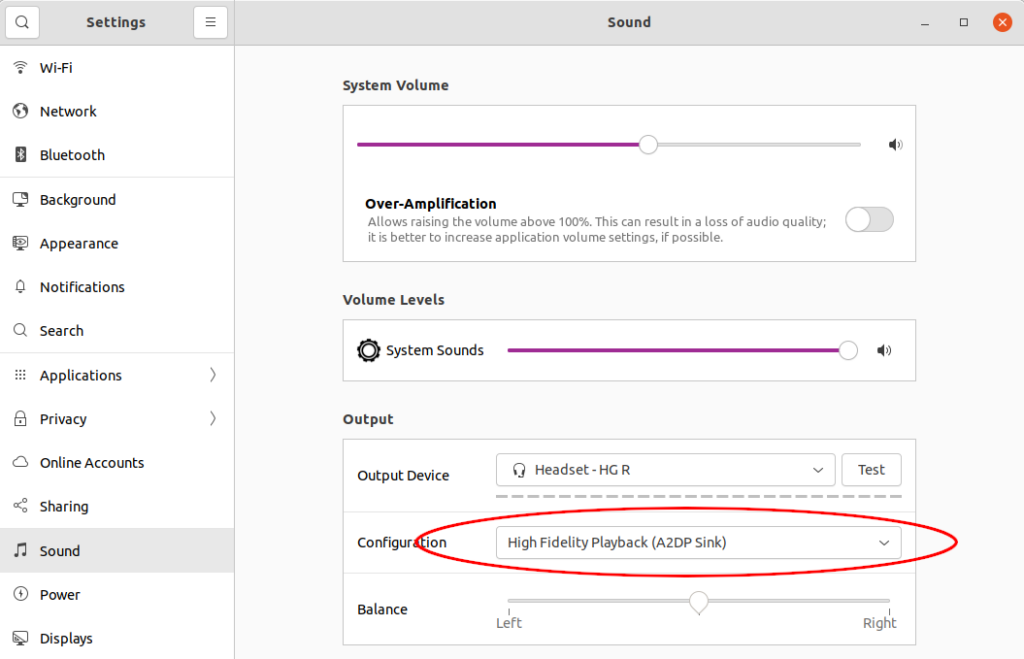
In the Sound settings, you see two main sections, one about the input and one about the output device. We primarily want to inspect the output device. It should be set to your currently connected hearing aid. If that is not selected in the drop down box, select it. Next, you should choose the “Configuration” of your output device, e.g. the hearing aid. Here you have the choice between “High Fidelity Playback (A2DB Sink)” and “Handsfree Head Unit (HFP)”. Those are two valid options, depending on how you want to use your hearing aids. You can use them as headset or as headphones.
(Not recommended:) Headset mode
Headset mode means you use the hearing aids to both listen to audio signals and to send audio signals, for example your own voice during a video call. As hearing aids do have microphones, it is actually possible to use those microphones like the microphone on a normal headset where you speak into it. However, as hearing aid microphones are placed behind or in the ear, they are not the best choice to record our own voice coming from the front of our head. I generally recommend not using the microphones in the hearing aids, but instead the ones that are built into your computer or – even better – a separate microphone plugged into your computer. But if for some reason you really want to use your hearing aids as headset, chose the option “Handsfree Head Unit (HFP)”.
However, be warned that the audio will be of low quality in both directions, because you need to share the bandwidth for input and output signal rather than using all of it for the output signal that you hear.
Note, that if you select this configuration, your Input Device (further down) will automatically set to your hearing aid as well.
If you play around with these settings and later switch back to headphone mode, make sure to set that to a different device than your hearing aids again.
Preferred: Headphone mode
Headphone mode means that you use the hearing aids only for listening and use a different microphone for sending audio (like the one built into your laptop or an externally plugged in one). I generally recommend this mode, because this way you get the best possible audio quality and that is what we people who are hard of hearing need. For this, choose the option “High Fidelity Playback (A2DB Sink)”.
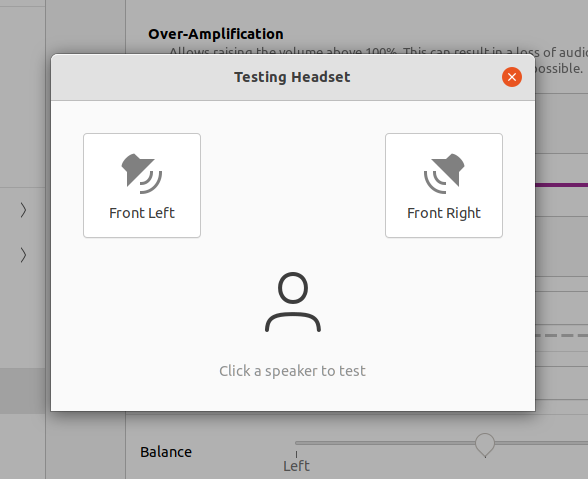
Testing the Device
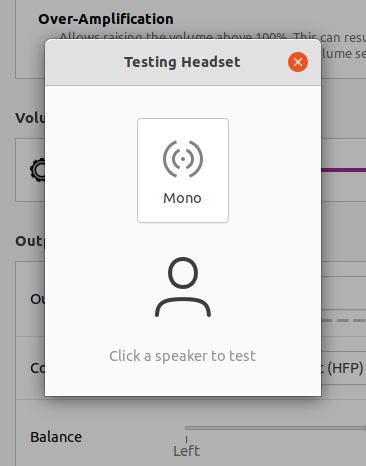
Once you have managed to select your hearing aid as an output device, you can test whether it works by using the “Test” button next to it. It opens another menu with more buttons. If you selected “High Fidelity Playback (A2DB Sink)”, you will have a left and right button and can check the sound going to both ears individually.
If you chose “Handsfree Head Unit (HFP)”, you only get one button that tests the mono signal.
For the remainder of this tutorial, I assume you have selected headphone mode as recommended.
No sound or sound only on one side
If you did everything by this tutorial and you still don’t hear anything when testing your hearing aid, check the various levers in the settings menu, in particular:
- At the very top “System Volume” should be set to something high, like at least 75% of the slide, if not 100%.
- Within the “Output” Section, there is the “Balance” lever, which should ideally be in the middle. If you experience that you hear sound only from one of your hearing aids, this lever might accidentally be slided to one side.
That’s it. I hope this tutorial has helped you. Do not forget to leave feedback (Contact).